Portable Homes & Tent Living
Portable homes, living tents, tiny houses, glamping tents… there are so many terms to describe the myriad of options we have to escape the city, the stress, or if only temporarily, the world. Whether your sense of adventure is calling you to a remote mountain valley, or your mind is begging for a private space to read and practice your ukulele, a small temporary abode put up in a matter of a few days can mean the difference between slowly going bonkers or finally writing that novel.
Buying a portable home can be an investment in joy – yours and your family’s. But deciding on the particulars can be challenging. We’ve put together this guide to yurts, domes and yomes to help you get a handle on all of the options out there.
Read on to learn the difference between the traditional yurt, the geodesic dome and their very admirable synthesis, the yome. We’ll help you narrow down the best strategy for selecting the right structure, the essential and not-so essential upgrades, the type of platform you’ll want to construct and even go through some interior design choices, including the age-old dilemma of “to plumb or not to plumb”.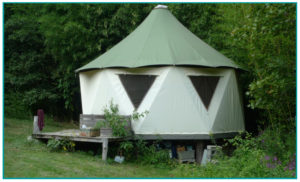
Dreaming about a little portable house? What’s the best design for you?
When you’re first starting out, there are so many things to consider. Materials, maintenance, efficiency, construction, longevity, placement, security, size, and price are just some of the questions to address. Don’t get discouraged by all the options. Let’s break it down by your needs and narrow in on the perfect tiny house.
After using the tips in this guide you’ll be well on your way to setting up camp by the river or in your own back yard. Planning, sizing, buying and putting up your living tent is an exciting time, let’s make the most of it by getting a few basics set in your mind.
What are you going to use your portable house for?
This is probably the first question to ask yourself. Presumably, you already live somewhere, so why do you need another home? Ah, so may answers here.
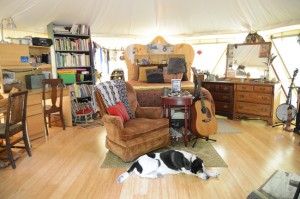
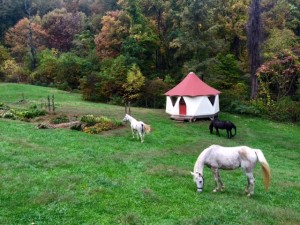
Maybe the call of the wild has finally reached a crescendo – you just need a place to get away. Whether it’s a family farm, a piece of land you bought out in the mountains, some acreage your uncle owns, or a gold-mining claim on BLM land on the Colorado River… a small portable house is just the thing for a significant getaway. Domes, yurt and yomes come in many sizes and can comfortably accommodate your family, some pets and all of your supplies, including games, guitars and hammocks.
 Many people have creatively used living tents for their back-to-nature businesses. Instagram-ready glamping by the waterfalls and on mountaintops. Scenic tiny house campsites for weddings and reunions. Nature Bed and Breakfast getaways. Ski lodges, eco-travel, fly-fishing camps, beachside no-impact resorts, dude ranch and holistic spa housing, concert glamping rental service, summer camps… if your business involves providing shelter, these portable homes are stylish, durable, and comfortable. And their low-to-no environmental impact is as hospitable as it is economic.
For others, the use is closer to home. A meditation center, private yoga classes, a playroom for the kids complete with an IMAX-like theater experience, a home office or writing studio, a she-shed or man-cave, a guest house in your back yard? There’s almost no limit to how you might use a tiny house.
Who is going to be using your Yurt, Dome or Yome?
This question obviously flows from the one before. Whether you’re using the portable house for yourself and your family or as a rental, the number of people that need to be accommodated should be at the top of your decision chart. Every manufacturer we’ve checked out offers yurts, domes or yomes in a range of sizes, with most dwellings ranging from 150 square feet to around 1,000. (There are portable structures intended for commercial use that can hold over 1000 people and cover over 10,000 square feet, but we’ll stick to the dwelling sizes for this guide.)
The number of beds and private or partitioned spaces should correlate to the number of related (and unrelated) occupants. You should also consider if there will there be kids or several unrelated couples that may need quiet or privacy.
If the portable house is located in a scenic location with weather suitable for outdoor activities, you’d be forgiven for assuming the indoor space may be utilized less, but that sudden summer thunderstorm is going bring everyone and the dog in from the rain. You’d better have enough chairs around the game table. The footprint of the portable house often correlates with the height of the ceiling, so keep that in mind too.
Selecting the optimal size (square footage and height) is going to be your first major decision. The larger the structure, the more it will cost to buy, maintain, heat, cool, build the platform and outfit with extras like additional windows.
Where are you going to place your portable house?
This is kind of a trick question because there are so many subtexts. The first consideration is the physical latitude and longitude of your getaway or your business. Do you have access to town utilities? Can you physically drive right to the location to drop off your yurt, dome or yome (and any additional building supplies you’ll need to build the platform)? Or are you going to have to hump everything through the woods?
There are solutions for any obstacle, but you should take stock of the situation to address this from the start. The weight of the components and the ease of assembly may (or may not) be a very important consideration for you. Make that call now.
Next, consider unique physical characteristics of your selected location. The scenic riverbank – does it ever flood? If so, a tall wooden platform would provide safety and a gorgeous view. The rolling mountain valley – how strong are the prevailing winds? Some manufacturers have engineer stamped wind-shear calculations available as well as additional structural reinforcements for high wind locations.
The hot desert? Does the shelter have passive ventilation or will you need to bring in electric fans? In the mossy woods is it always shady or will the sun ever hit the shell to dry it out? Just like a regular home, living tents require periodic maintenance… more on that later. On a high altitude mountain side – what’s the average snow load? In your back yard – do you need a building permit to run electricity to a temporary structure of a certain size?
 Yomes, yurts and domes each have their unique strengths and benefits. Read on.
And the last major consideration in this category is quite literally, what will be directly beneath your structure? Most people build wood decks or elevated platforms sized for their living tent and some hanging-out space for a grill and a picnic table. Others prefer the solidity of a stone or concrete pad with a firepit and a hammock stand. While others simply want hard-packed forest floor with some throw rugs.
Depending on the property, you could even build a crawlspace, cellar or a full basement beneath the structure, ensuring an exceedingly secure space to lock your valuables or food stores. Platforms are generally not supplied by the manufacturer, though some provide size guidelines and even concept drawings.
How often are you going to use your portable house and what will you do with it when you’re not using it?
The question relates largely to issues of weather, maintenance, and security. If you’re going to live in your tiny home full time, then you’ll just need to keep up with proper maintenance and repairs as needed. If your glamping tent encampment is a business, you’ll probably have a cleaning, security, and maintenance schedule as part of your day-to-day list of chores for yourself or your staff.
But if you’re planning to locate your family hideaway on a remote mountain top and only visit occasionally, you need to plan ahead. You’ll need a plan for secure storage of your furniture and belongings – both Goldilocks and Bigfoot have been known to take a nap where they didn’t belong. And you need to make sure the cover is cleaned and treated at least once a year. The wood components of your structure and the platform need to be stained periodically. And of course, you really don’t want to skip the trip to the campsite for a few years only to return to find that a tree has fallen on it and squirrels have made nests in your bed.
One option is to hire (or bribe) a reliable person to check in on your property from time to time, same as you would for a vacation home. If you know you’ll be gone for a few years, it makes sense to simply take down the structure and erect it again when you return. If that’s the case, ease of assembly and storage is key and upgrades of glass windows and full size wood doors will make transport and storage more difficult.
All About Yurts
What is a yurt?
Yurts have been a distinctive feature of life in Central Asia for at least three thousand years. The traditional Mongolian herders’ hut consists of a self-supporting wooden circular frame carrying a felt cover.
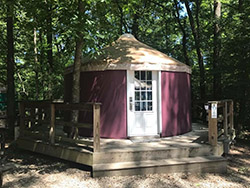
The modern Yurt consists of engineered lattice wall-sections, windows (clear vinyl or even glass), a door, rafters, and a compression ring in the top center. Modern yurt covers are made with durable, waterproof, flame resistant, commercial fabrics with a proprietary vinyl coating. The coating is weather repellant, offers mildew and UV resistance, and comes in many colors.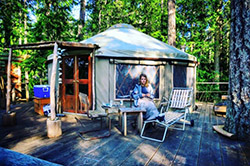
A yurt is designed to be dismantled and the parts carried on camels, yaks, or even Subarus. If you don’t have an entire tribe handy to help pitch your yurt, don’t dismay. Most yurts can be put up by a group of handy friends in a day or two. The hardest and heaviest part is putting up the first few rafters with the center ring – this requires several people and some ladders. After that, attaching the cover, installing the doors and windows is not difficult at all.
Yurts are designed to withstand heavy winds and snowloads and can be ordered with insulation for the roof and walls as well as extra braces for challenging environments. A wood stove (with a manufacturer provided chimney and roof penetration) is an important and aesthetically wonderful addition if you’re located in a cooler climate.
Similar to a teepee, a yurt has excellent updraft venting capabilities and is very comfortable in high temperatures due to the built-in skylight in the top center. Some manufacturers offer an acrylic dome that can be raised and lowered, allowing you to adjust ventilation and heat gain. Self-ventilation is perhaps the yurt’s greatest features. Having experienced this first-hand in the desert, we can tell you that the yurt very stays comfortable throughout the day.
Does a yurt need a foundation?
If you’re using your yurt for just a few days of camping or glamping, you can probably get away with securing the erected yurt with some heavy-duty guy wires (as you would a tent) directly on the ground. However, for any extended stay, your yurt needs to be attached to a proper foundation. The most common is a round wood deck which is the same diameter as your yurt. This is a relatively low budget option and works well if you have a tight space. You can add some steps down from your front door or build a separate “front stoop” area. The circular deck must be the same footprint as your yurt for the simple reason that this allows the yurt’s side cover to hang below the deck level and secure to the bottom of the circular platform. This provides a weather tight seal.
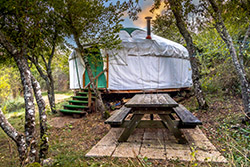
If you’d like a larger deck, extending all or part way around the yurt, you could build one of any size, shape, and just about any material (including wood, Trex, concrete, SIPS or stone) and then add the raised circular platform that will fit your yurt on top of that.
If you have the budget and inclination, you could insulate this raised up deck and even install radiant heat under the platform. Check with the manufacturer about the required height of the circular raised deck. Usually, they need about 5-8 inches. Remember to plan for your plumbing and electrical connections in advance! Making the raised platform even higher can provide a crawl space for accessing your utilities and even some additional storage space.
Can a yurt have modern conveniences?
Since we are discussing utilities, now is a good time to bring up electricity. Electrical wiring in a yurt is typically done through the platform and floor. Outlets can be mounted in the floor, on short support posts around the perimeter, or positioned at convenient heights and locations on interior partition walls. A licensed electrician can make sure you have enough power for all your lighting, cooking and heating needs and install a breaker box for all the outlets and switches. If electrical service is not available at your site (or you prefer to be off grid) then you will want to explore solar or propane power or pack lots of candles!
Yurts can be partitioned to create private spaces. Interior walls can be added to provide a separate bathroom, bedrooms or a kitchen. If you are handy, you can tackle the basic framing yourself and can benefit from looking at numerous sample yurt floor layouts available on the internet. It is important to note that the interior walls should be freestanding and firmly attached to the floor (not the roof rafters or the lattice perimeter) preferably forming T’s or L’s for additional stability.
If the size of your yurt permits, you may choose to frame out an interior bathroom. The pipes are installed (after the yurt is erected) in the same way as a conventional site-built house. This is typically done by a plumber who will bring the pipes through the platform/floor and connect them to the sewer or a septic tank on the property. Venting from the bathroom can be accomplished with vents through the floor or through the wall of the yurt using a flashing kit. In remote areas without utilities, you can look into composting toilets and alternative gray water systems. Alternatively, check out plans for outhouses and outdoor shower rooms. They can, in fact, be quite civilized.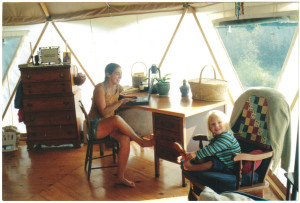
Your yurt’s kitchen can be designed with standard cabinets and counters purchased locally or custom-built to accommodate the curved walls. If you are installing a bathroom, it’s best to position the kitchen directly on the other side of that partition wall so that the plumbing can be shared.
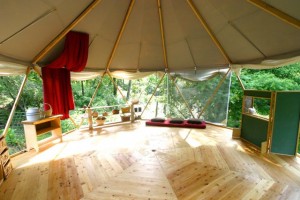
The flooring inside your yurt can simply be the platform material, some snazzy throw rugs or even snap-together faux wood flooring. It all depends on you and your need to keep the outdoors (wind, sand and critters) outside your yurt.
And speaking of floors, did you know you can add a second floor to your yurt? Well, not exactly a second floor, but a loft is definitely an option in the larger models. If your yurt is wide enough, it will be tall enough to accommodate a loft. Lofts should be freestanding structures built after the yurt is erected. They cannot be attached to the roof rafters or lattice walls of the yurt. As you’re planning out your interior rooms and partition walls, consider adding a loft space that doesn’t block the center ring (and its marvelous ventilation powers).
All About Domes
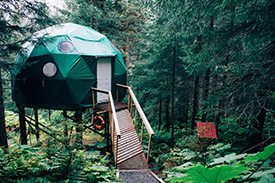
What is a geodesic dome?
In 1970, when R. Buckminster Fuller received a gold-medal for his development of the geodesic dome, the American Institute of Architects called it “the strongest, lightest and most efficient means of enclosing space yet known to man.” The dome is in fact a polyhedron, composed of triangular planes, which can withstand pressure on all sides.
Fuller began developing the geodesic dome in the 1920s and discovered that a sphere created with triangles has incredible strength because it is dependent on tension between the parts, as opposed to compression. Add to that the mathematical fact that a dome encloses the largest volume of interior space with the least amount of surface area, (a substantial savings on materials, cost and weight) and you’ve got yourself one truly amazing bit of portable house engineering.
What are considerations unique to domes?
The geodesic dome is theoretically one of the most cost effective structures there is. In fact, the larger the dome, the more cost efficient it becomes to construct. Present day portable domes are generally assembled from kits that come with precut and specially formed galvanized steel tubing for the frame and a weather-treated light permeable vinyl or canvas cover for the shell.
Depending on your location, the tubing may be “beefier” to withstand winds and heavy snowloads and the shell material may include screens and/or clear vinyl sections to let the light shine in. Heavy duty anchors secure the dome frame to asphalt, concrete, earth, or a deck. A specially built deck or platform is not needed.
What is required, however, is a complete lack of acrophobia. One way or another, you will need to climb to the top of your dome so secure the tubing and drape and secure the cover. This will involve ladders or scaffolds and not a small amount of daring.
While actual doors and doorframes feature prominently in most portable dome setups, operable windows do not. Some domes come with screens or zippered portholes within reach, and most include the option for a transparent vinyl wall, bay window or skylight which opens the interior to the views and inquisitive neighbors. This does, however, impact ventilation.
How do you ventilate a dome?
Domes can be a little tricky to keep cool. While roof screens are available, they are not really practical unless it never, ever, ever rains in your location. On some models, the lowest section of the wall can be rolled up to provide cross ventilation along the bottom couple of feet. But that doesn’t address the buildup of heat toward the roof.
Side-wall air vents, fans and/or air conditioning are absolutely needed in warm climates because ultimately, the dome is a bubble. A UV insulative paint is an option for the exterior, actually creating an impressive R value because of its reflective properties. This does change the appearance of your dome, but it comes in many colors and extends the life of your canvas.
For cooler locations, a removable interior insulation liner is available from some manufacturers. Combined with a wood burning stove and the efficiency of the dome shape, comfortable interior temperatures are relatively easy to achieve.
What else should you plan for with a dome?
Most manufacturers offer an option of a vinyl floor that zips onto the walls, creating a watertight seal. This is a nice option as domes can be placed on just about any surface and this is a one-and-done solution. Depending on your budget and preference, however, flooring can be an elaborate, permanent affair with hardwoods, carpeting, radiant heat and insulation.
Like a yurt, a dome can be placed on a specially raised deck or platform, allowing space underneath for utilities, storage and insulation.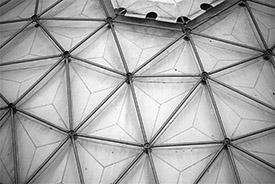
A dome can have partition walls erected for privacy and separation. A kitchen area, a bathroom or even bedrooms can be incorporated into your interior space with free standing walls that can carry plumbing and electrical connections. You will want to take advantage of the views afforded by the clear vinyl section of walls and design your partitions accordingly. Most dome dwellers seem to prefer a big open space in front of the bay window.
Another elegant feature of a geodesic dome is that its structural integrity is not compromised by suspended lights or even a hammock off the metal grid though you should consult with the manufacturer for weight limits. Keep in mind that the interior curvature of the dome means that there is less headroom the closer you get to the wall. This space is either wasted or used for storage or short furniture.
How portable is a dome home?
The most attractive feature of the dome is it portability. Because they pack down so compactly they can be transported and erected almost anywhere. In addition to housing, domes are frequently used for popup events, such as planetariums, theaters, dancehalls, famers markets, schoolrooms, greenhouses and even playgrounds (think Thunderdome, but with cute little kids instead of the Mad Max fighters). We’ve even seen domes specifically designed to be used as outdoor amphitheater for operas and rock concerts.
The dome’s inherent ability to grow to outsized proportions may be its most appealing feature.
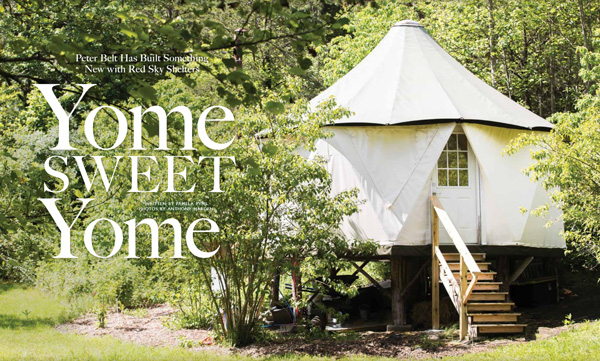
All About Yomes
What is a Yome?
A yome is the happy synthesis of a yurt and a dome. Taking the geodesic strength of the polyhedron’s triangular planes and combining it with the self-supporting roof structure of the yurt, the yome takes advantage of the best of both designs: the incredible shear strength and ease of assembly of a dome, and the straight walls and marvelous ventilation of a yurt.
 Like the dome, a yome is technically the top half of an icosahedron, which is a convex polyhedron with 20 faces, 30 edges and 12 vertices. (Think D-20, with a flat bottom. If you get the reference, congratulations, +5 WIS.)
Replacing the flimsy framework of the yurt’s lattice wall with sturdy wood braces in a triangular framework makes the yome perfectly rigid yet uses significantly less wood. While a yurt’s roof and side wall are held together by cable and are therefore prone to side-to-side movement, the yome takes advantage of the geodesic dome’s polyhedron tensile strength and doesn’t succumb to wind shear. In areas of extreme snowload, however, the yome is not quite as strong, and requires periodic brushing off (or interior heating) to prevent several feet of snow from accumulating on the roof.
What are the strengths of a yome?
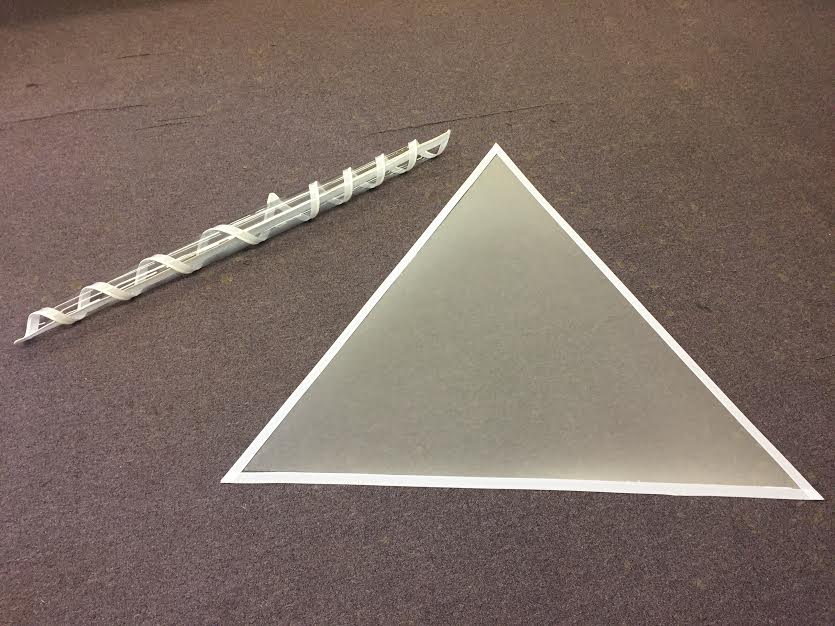
In terms of portability and assembly, the yome is a champ. Like the dome, the yome’s walls are made of dense wood poles assembled into triangles – strong yet light. No giant lattice wall to pack up and carry. Yet, unlike the dome, the roof structure of the yome returns to the basic simplicity of the yurt, allowing just several people to raise the roof and install the skylight and rafters without scaffolding or Olympic climbing skills.
One of the most noticeable differences between a dome and a yome is the interior. A notable disadvantage of the smaller semi-spherical dome is its curved walls. You don’t see if from the outside, but a significant portion of a dome’s interior space is lost to low headroom along the perimeter. This is another area the yome shines compared to domes. The upright six foot walls of a yome make it so that every inch of your interior space is usable.
Like yurts, the yome manufacturer offers different fabric covering for the roof and walls. Unlike domes, whose monolithic PVC, or vinyl-coated materials render the structure unbreathable. Options abound, whether you are looking for different colors to suit the location or have specific needs based on the prevailing climate. You may be particularly interested in a yome if being kind to the environment is of concern to you. Yomes are the only portable homes currently available with a PVC-free, “green” silicone-coated roof.
Interestingly, yurts and yomes differ in the way they let in light. Most yurts combine a large skylight with reflective foil insulation that renders the roof and walls completely opaque. The yome, on the other hand, combines a smaller frosted skylight with translucent walls and translucent insulation. This creates no harsh hot spots in Summer when the sun is high and a steady glow in Winter, when the sun is low and light is most welcome. Electric lights, of course, can also be installed.
Are there other considerations to plan for with a yome?
Just like with yurts or domes, the yome can be connected to electricity and plumbing. You can connect to existing utilities or go off-grid with solar, hydropower, or a generator.
 Unlike a yurt, a yome does not require a raised platform to accommodate the weather flap, although placing it on one will provide convenient access for utility hookups, ensure a level base, and help minimize the need for water diversion systems.
Flooring options are as numerous as they are for yurts and domes: rugs, wood, or bamboo floors, stone, or brick or tile – with and without insulation or radiant heat. In colder settings, having radiant heat or a brick floor to serve as a heat sink (to store the warmth from your wood stove) would feel very cozy indeed. Other heating options include vented and unvented propane heaters, vented kerosene monitor heaters, pellet stoves and electric heaters. Generally, 25,000 BTU’s is plenty to heat a yome.
For cooling and ventilation, yomes come with a top vent – either a screened ventilation opening at the roof or an operable acrylic skylight. Incorporating what is arguably the yurt’s best feature – the central ventilation skylight, the yome makes it easy to open and close the skylight with a simple telescoping pole.
How should I customize and build out my yome?
Windows in a yome are huge triangles and offer completely unobstructed views compared with those in a yurt which have a row of latticework between you and the great outdoors. They’re available in roll-up vinyl and even more glass-like polycarbonate. Window number and placement is fully customizable and you can opt for the 360 view or leave some walls solid for privacy. The standard yome entrance is a zippered opening which is great for portability. For more permanent installations, a system is available to accommodate a standard 32” pre-hung door.
Insulation options are available with yomes just as they are with yurts and domes. As mentioned earlier, the wall insulation kits available from the yome manufacturer are translucent, allowing light to permeate through the walls. A reflective radiant barrier similar to that used in yurts is available for the roof.
Interior partitions, a kitchen and even a loft can be framed on the interior of a yome. Though the loft must be self-supporting, it can be braced against the yome’s stable framework (in a yurt, which is less rigid, lofts and partition walls must be completely freestanding). The decision to create a bathroom is, as always, up to you. Whether you plumb your yome, utilize a composting toilet, or build a practical outhouse or sunshower is something you need to decide and incorporate into your site plan ahead of time.
The bottom line.
In our analysis, the yome is easily the simplest of these three structures to transport and erect. It is likely to be the most affordable option as well. This comes only at the expense of size, as yurts and domes are available in bigger sizes if you need a gathering space larger than a tiny home. Yomes also have a special emphasis on being aesthetically pleasing, creating an almost magical interior space.
Care and Maintenance of Tent Homes
All portable homes need TLC.
Just as you wouldn’t leave your car unattended for months at a time, you wouldn’t just leave your yurt, dome or yome without providing for some periodic maintenance and security. With proper care, your portable house will be comfortable and secure for many years to come.
Siting your tent home.
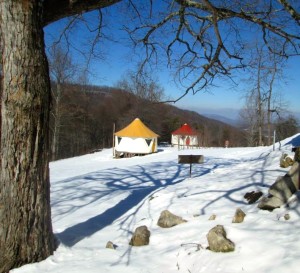
At the start of this article, we talked about the important role your home’s location will play. Let’s return once again to the physical characteristics of your location. A dome in the desert, a yurt in the woods, a yome on the coast of Maine will have fairly unique maintenance requirements.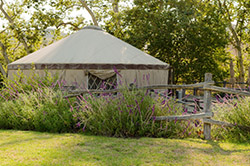
Protecting your home from punishing UV rays, sea spay, mold and falling objects should be your first consideration. Given the option, find some shade – UV rays are detrimental to all surfaces. But make sure that your home gets a little sunlight to dry things out and help fight mold. Certainly, be aware of dead or dying trees over your home and try to shelter your structure from prevailing winds.
Caring for fabrics.
Extend the life of your cover fabrics by faithfully following a cleaning and treatment regimen. Most manufacturers provide or recommend specific products to wash, treat stains, and remove mildew and mold. Use them regularly. If appropriate, use a UV protectant to extend the life of your canvas.
Don’t use DIY or grocery store cleaning solutions that are not specifically recommended by the manufacturer for your type of cover. They could remove the fabric’s mildew resistance, fire retardant or UV coating.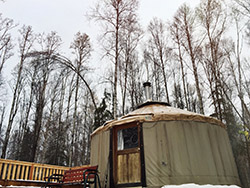
Fixing small tears in the exterior cover is usually a matter of gluing a fabric patch on to the canvas or vinyl. No sewing skills required! Clean leaves, dirt and debris from your home’s seams, awnings, jambs and roof. Think of it as cleaning the gutters. Best do it well before weeds start to grow.
Depending on the type of fabric (and here we use the word generically, your exterior may be vinyl, canvas, hemp, acrylic or any combination of materials), most manufacturers say it will last 10-15 years with proper care. Other components (like door jambs or acrylic skylights) may need to be replaced sooner.
Caring for other components.
If your portable home has a wood frame, door and/or deck, maintain these components with a fresh coat of stain or paint. Keep an eye for termites, carpenter bees, and woodpeckers. Take steps to convince these creatures that your home is not theirs for the eating.
Windows, acrylic dome covers, vents and wall penetrations need special attention as well. Check your stovepipe vent and the Velcro that holds your windows in place. Wash your dome cover with mild soap and water and remove debris.
And have we mentioned critters? Large (as in bears), medium ( like raccoons) and small (like mice and wasps) – everyone loves shelter. Don’t let yours become a multispecies commune. Make sure all food and scented items (like those cheesecake scented candles) are removed from your tiny home if it is going to be unused for a while. Seal all the flaps and windows. Lock your doors. And try to arrange for someone to check in on occasion.
Stick to a regular inspection, maintenance and cleaning schedule. Don’t expect your portable home to be just fine if you simply abandon it for great lengths of time. Besides unexpected residents, you could be facing expensive repairs and even needing to replace major components.
Your yurt, dome or yome will last far longer if you care for it properly.
Getting Started
Making a decision and buying your portable home.
If you’ve read this far, your head is swimming with ideas and you’re probably itching to look at floorplans and photographs. But hang on. First, make sure you’ve got your decision criteria at hand and be certain of your answers to the following questions. Once you’ve answered them, you will have a pretty good idea of whether a yurt, a dome or a yome best fits your needs.
- Where will your tiny home be located?
- Is it mostly cold, warm or wonderfully temperate there?
- Will the home stay there more or less permanently or will you be moving it around frequently?
- Will you have to carry the tools, materials and components to the site or can you drive a truck right up to it?
- How many people do you have to help you put it up?
- How many people will be staying in the tiny home at once?
- How often?
- Just friends and family or is this a rental business or both?
- What’s more important to you, how photogenic the dwelling is or how comfortable it is for longer residencies?
- What are some of the must-have options that you just can’t live without?
Time to visit some websites. Most manufacturers are great at posting galleries of their portable homes in situ. This is a terrific place to get decorating ideas and inspiration. But stay firm to your criteria. Instagram-filtered, soft focus photographs are beautiful. But how will that translate to the specific location you have in mind and the type of furniture that actually fits your lifestyle and budget.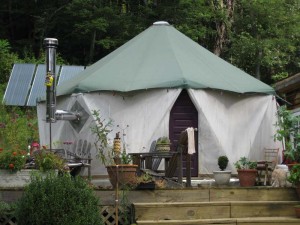
Next check out the manufacturer’s floorplans and list of upgrades and options. Many have pricing guides based on size and material choices. Price out what you think you need. Is the price in your ballpark? Check to see if they offer replacement parts for when things occasionally wear out. Check if they have upgrades like insulation, additional windows, snow load or high wind kits. Do they have a warranty?
Then get it touch. This is a major purchase for most people so call the manufacturer directly and see if their personality works with yours. You may have specific questions not answered on their site or just want to discuss your specific ideas. These folks have loads of experience, they love what they do, and will gladly take your call.
Remember to ask about shipping.
Most manufacturers of portable houses are not Fortune 500 companies. Not by a long shot! They are independent local businesses that take great pride in their products. It is likely that your yurt, dome or yome will be made to order after you’ve paid or put down a deposit.
It can take anywhere from two to ten weeks for your portable home to be delivered. Take that time, if you can, to prepare the location. Build your platform, run your utilities, construct a sunshower, and find the furniture you’ll need to start. Also, line up a helper or two.
Unless you’re lucky enough to live close to the manufacturer, your yurt, dome or yome will likely be shipped to you. Depending on the type and size of home you selected, your crating and shipping charges can vary significantly. Yurts seem to be the heaviest and bulkiest of the bunch, with substantial crating and freight charges. Yomes seem to be most economical at $100- $700 for most deliveries.
Most manufacturers are happy to ship internationally but be prepared for additional charges there in addition to possible customs duty. Local use taxes are usually the buyer’s responsibility since these are typically companies with just one location. Of course, if you’re buying a tiny home as a business, you may be able to deduct the shipping cost and/or be tax exempt.
Now go have fun!
Ok, time to do the work. Remember… have fun, look good, and be safe! Safety third. 🙂
 That sure was a lot to consume in one sitting. Thanks for making it this far and we hope this helps you make some considered decisions. Just remember, this tiny home will be a member of your family for a long time to come. If you follow your own decision-making criteria, it will fit in just perfectly.
And when you’ve got it all set up, you can sit back, look at the stars and authoritatively tell your first really bad campfire joke. Here, we’ll get you started.
Q: What do you call a bear with no teeth?
A: A gummy bear.